we help service-based business owners, freelancers, and aspiring businesses with our content & services & When readers purchase services discussed on our site, we often earn affiliate commissions that support our work. Find out more about Income Wired
To activate your WordPress blog, click here, then follow the instructions below to get started.
Are you interested in starting a blog? If so, this is the perfect guide for you! In this tutorial, we will walk you through the process of starting a blog with Bluehost and WordPress. We will cover everything from registering a domain name to setting up your blog’s design. So whether you’re a complete beginner or just need a refresher, this guide has you covered for just about all aspects of your blogging journey and not go through any problems as I did when I first started.
I remember back in 2013 I was just 23 years old at that time, and I was struggling to find more business for my company. The construction industry is tough and when you are just getting started it can be extremely difficult to get your name out there. I was working day and night, trying to put together a portfolio of projects that I could show future clients, but it just wasn’t enough. It was then that someone suggested starting a blog.
At first, I thought they were crazy! Why would I want to start a blog? What would I even write about? Surely no one would care what I had to say. But the more I thought about it, the more sense it made. Starting a blog could be a great way to attract new business and build my brand.
If you are like me, starting something new can be daunting but everything worth having always begins with the first step. Let’s look at some benefits of starting your blog or website:
Benefits of Having Your Own personal or business Blog:
- You Are in Control: When you have your own blog, you are the boss. You get to decide what to write about, when to publish new posts, and how to promote your content.
- It’s a Great Marketing Tool: A well-designed blog can be a powerful marketing tool. Use your blog to showcase your work, build relationships with potential customers, and drive traffic to your website.
- It’s a Great Way to Build Your Brand: A blog is a great platform for sharing your ideas and building your personal brand. By writing quality content and promoting your blog, you can attract new readers and followers who will be interested in learning more about you and your business.
To date, I no longer do any sort of paid advertising, my business website generates enough leads through organic traffic that I am able to maintain a busy work schedule without having to actively seek out new clients.
I’ve learned the benefits of having my business online and blogging has been a huge part of that. If you’re on the fence about starting a blog for your business, or even just a personal blog, then I hope this guide will help you make that decision. Trust me, it is one of the best decisions you could make for your business or as a way to create your brand and get the word out. Your blog does not sleep, it’s always online, and it’s always there for your audience. The best part is that once you start earning money via your blog, it pays for itself!
If you’re still reading this, then chances are you’re very serious about starting a blog of your own. Maybe you’re not sure where to start, or maybe you’re just looking for a little guidance. Either way, I will show you everything you need to know about starting a blog with Bluehost and WordPress. By the end of this guide, you will have a fully functioning blog that is ready to be filled with great content!
Here’s what we’ll cover in this guide:
- Registering a Domain Name
- Setting Up Your Hosting Account
- Installing WordPress
- Choosing a Theme
- Creating Your First Blog Post
What is Bluehost?
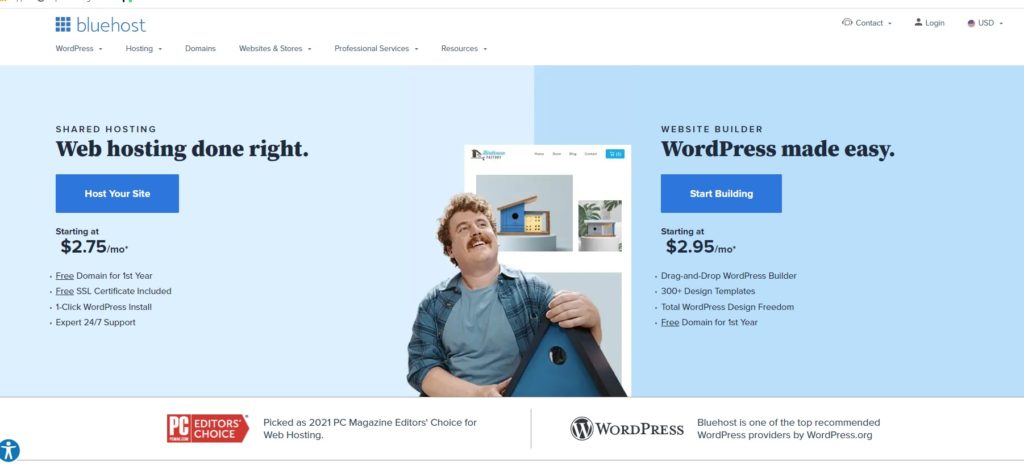
Bluehost is one of the largest and most popular web hosting companies in the world. They are an officially recommended WordPress hosting provider, which means they are specifically designed to work with WordPress websites. Bluehost offers a variety of different hosting plans to fit your needs and budget.
They have a basic shared hosting plan that is great for new bloggers who are just getting started. If you find that you need more power and resources as your blog grows, they also offer VPS and Dedicated server plans. No matter what size your blog is, Bluehost has a hosting plan that will work for you.
Here are some of the reasons I recommend Bluehost:
- Easy to use: Bluehost is very user-friendly, even for beginners.
- You get a Free domain( Your business, personal name, or brand) for the 1st year
- Affordable: Bluehost plans start as low as $12.95/month.
- Free Domain Name: When you sign up for a new hosting account with Bluehost, you can register a free domain name.
- Free SSL Certificate: All websites need an SSL certificate to be secure. Bluehost offers a free Let’s Encrypt SSL certificate with all of their hosting plans.
- 24/seven Support: If you ever have any questions or run into any problems, Bluehost has a team of expert support agents available 24 hours a day, seven days a week to help you out.
- Easy one-click WordPress available
Why Paying for your hosting is better than blogging for Free on Blogger or WordPress.com
While there are some free blogging platforms available, I don’t recommend using them if you’re serious about starting a blog. When you pay for your own hosting and domain name, you have complete control over your website. This means you can install any themes or plugins you want, and you don’t have to worry about ads being displayed on your site.
Another benefit of paying for hosting is that it generally comes with better customer support. If you ever have any questions or run into any problems, you can contact your host and they will help you resolve them.
You Can Make Money off Your Blog
No matter if it’s a personal blog or a business blog, you can make money off your blog. There are a few different ways to do this:
- Advertisements
- Affiliate Links
- Sponsored Posts
- Selling Products or Services
To get started with Bluehost, click here
How to Start a Blog with Bluehost and WordPress:
Now that we’ve gone over some of the reasons why you should start a blog, let’s get into how to actually start one. I’m going to walk you through the entire process, step by step so that by the end of this guide you will have your very own blog up and running.
Follow these simple steps and you’ll be blogging in no time:
Step One: Registering a Domain Name
To Register Your Domain Name Click Here, then please proceed with the instructions
The first step is to register a domain name for your blog. Your domain name is what people will type into their browser to find your website. For example, my domain name is “incomewired.com.” You basically select a name you like and then see if it’s available.
If the name you want is already taken, don’t worry! You can try a different variation or add a word to the end like “myblog.com” or “bloggingtips.com.” Once you’ve found an available domain name that you like, you can register it through Bluehost and acquire your domain for Free for the first year with a free SSL certificate.
Tips When Selecting Your Domain Name:
Keep it short and easy to remember
If for your business, it makes sense to use your business name, remember, people, will search for your name online, If your business is ABC Roofer, then ideally, having abcroofer.com would be great, but if it’s taken, don’t worry, you can get creative and type in something that is most similar to your name, having consistency across the web for your company is a plus as more people will be able to find you.
If for personal blogging, then you have more creative reign, but the same rule applies, try to keep it short and memorable.
2. Make sure it’s relevant to your blog’s topic
Think about what you plan on blogging about which will help with SEO, for example, incomewired.com is my blog’s name, I thought about this domain because I wanted to talk about income and how it’s connected to just about everything.
Make sure it’s available as a .com, .net, or .org. These are the most common and recognizable extensions
3. Avoid using numbers or hyphens
Step Two: Setting Up Your Hosting Account
The next step is to set up your hosting account. This is where you will actually store all of the files and content for your blog. I recommend using Bluehost because they are one of the largest hosting companies in the world and it makes sense to do so if you have the domain registered with them already.
To activate Your hosting click below:

Why signing up for a 12-month plan is the best option:
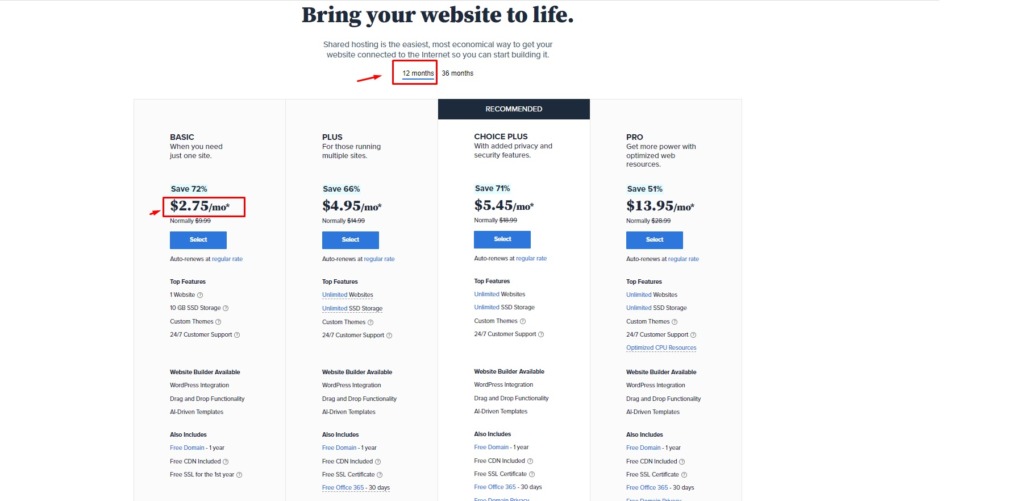
You get the best deal possible- By signing up for a 12-month plan, you’re getting the best deal that Bluehost offers. Not only will you save money by signing up for a longer period of time, but you also won’t have to worry about your hosting bill for a whole year. When I first started, I worked on my site slowly to make sure I did not do any mistakes, it took me at least three months to get everything the way I wanted it and by signing up for a longer period of time, I saved money.
- It’s easier to budget for When it comes to budgeting for your blog, it’s always better to know exactly how much you need to pay each month. This way, you can plan ahead and make sure that you have enough money set aside to cover your costs.
- You can always cancel if you change your mind- If, after signing up for a 12-month plan, you decide that you don’t want to continue with Bluehost, you can always cancel your account and get a refund for the unused portion of your hosting.
- To sum it up, signing up for a 12-month plan is the best option because you’ll save money, it’s easier to budget for, and you can always cancel if you change your mind.
Bluehost also offers You a Free SSL Certificate, but what is that?
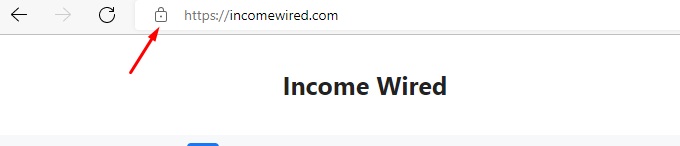
An SSL certificate is a digital certificate that authenticates the identity of a website and encrypts information sent to the server using SSL technology. Encryption is the process of scrambling data in transit so that only the intended recipient can unscramble and read it. A website that uses an SSL certificate has “HTTPS” in the address bar rather than “HTTPS.”
In addition to encryption, a blue-green padlock icon appears in the address bar, letting visitors know that their connection to the site is secure. It offers your website/blog visitors a sense of security, which can increase conversions and sales.
Instructions to Get Hosting With Bluehost:
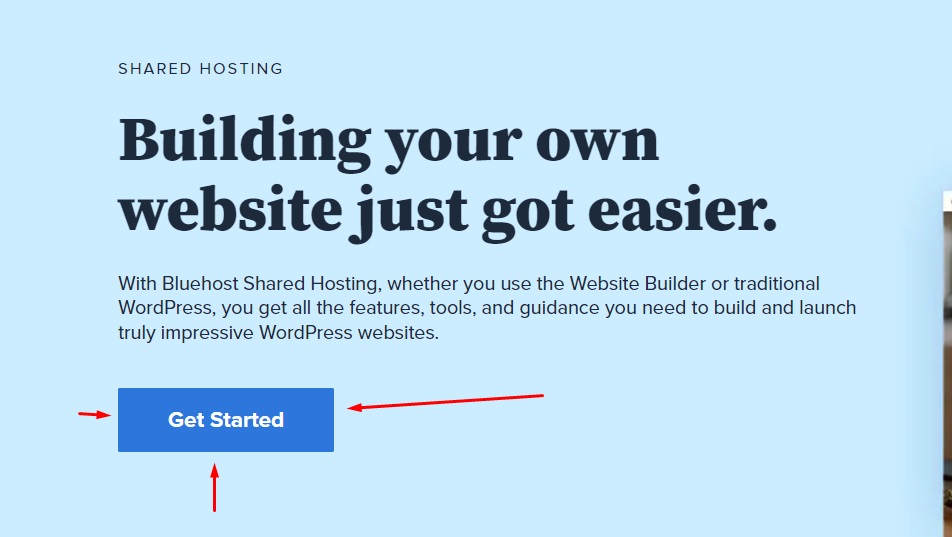
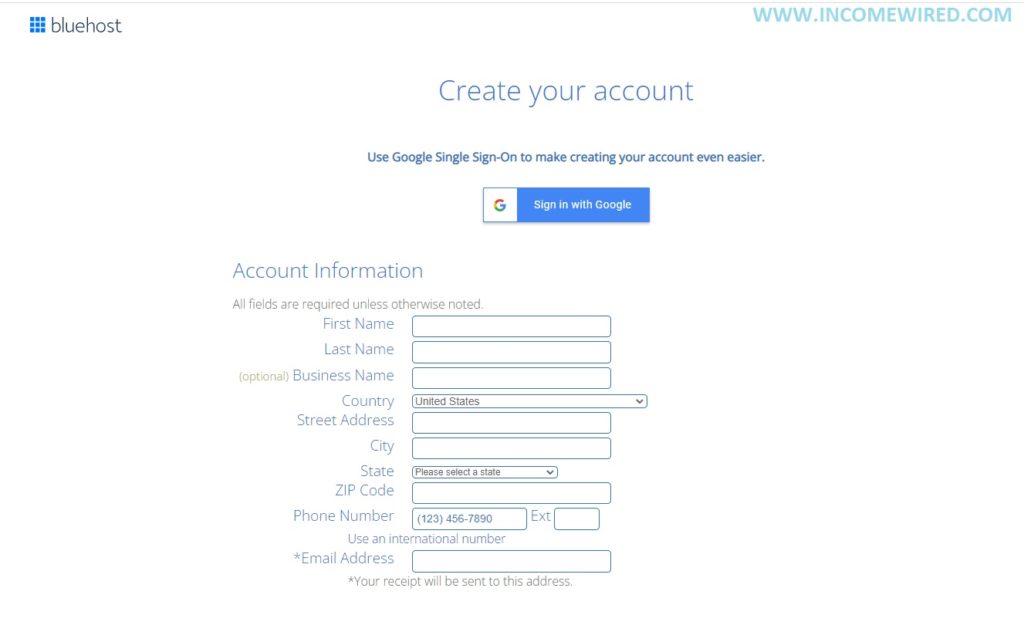
- Click here to get hosting with Bluehost
- Click on “Get Started “
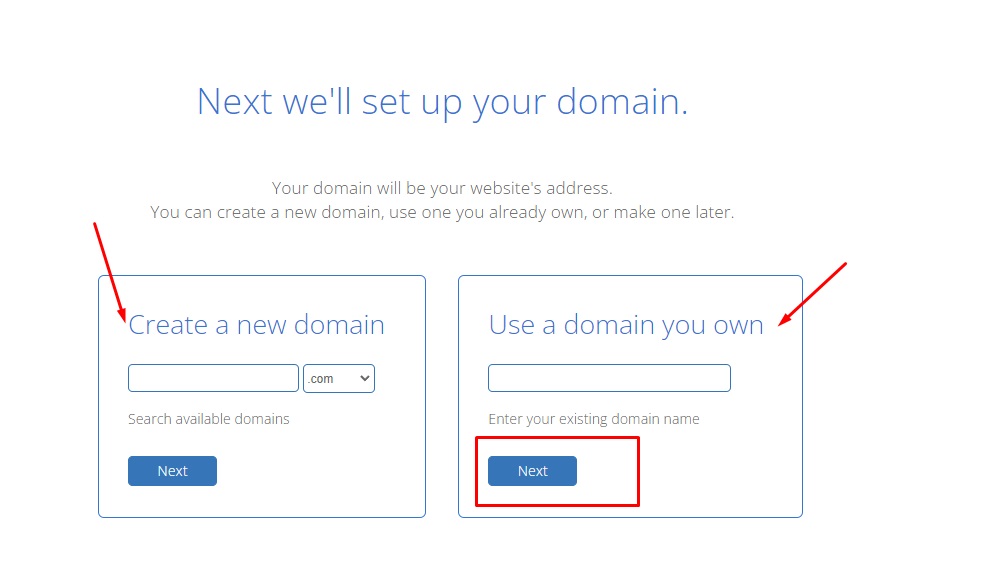
- Enter the domain name that you registered in the previous step and then click “Next.” If you didn’t register your domain with Bluehost, don’t worry, you can still use Bluehost for your hosting by selecting the “I have a domain name” option and then entering your domain name into the box or you can still search for a new domain here
- Fill out Your Account Information
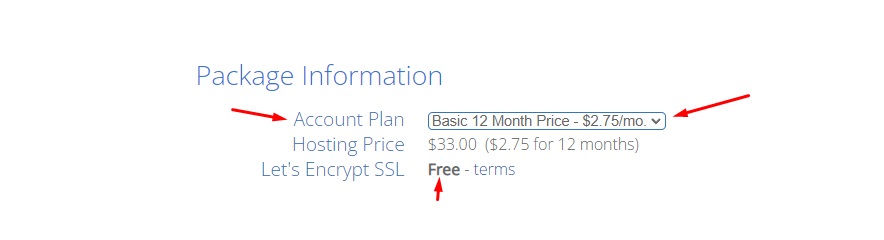
- Select your hosting plan (I recommend the Basic Plan) You can always upgrade later if you need to.
- you will be asked to select your package extras. Here you can read each of the extras and select the ones you want.
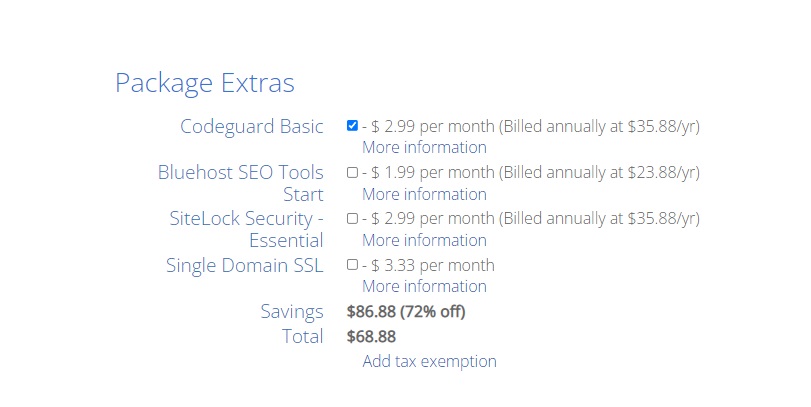
I recommend getting the Domain Privacy+ Protection because whenever you register a domain, your personal information (name, address, email, etc.) is made public.
The Domain Privacy+ Protection service will keep your information private so that you don’t have to worry about it being leaked. It’s a small price to pay for peace of mind and it also limits the number of junk emails and spam you receive. If this is not an option, you can add it later as an addon. Refer to this article here
You can uncheck the other options if you do not want them, typically I do not select any of the others, the only other one I would consider is the Codeguard Basic.
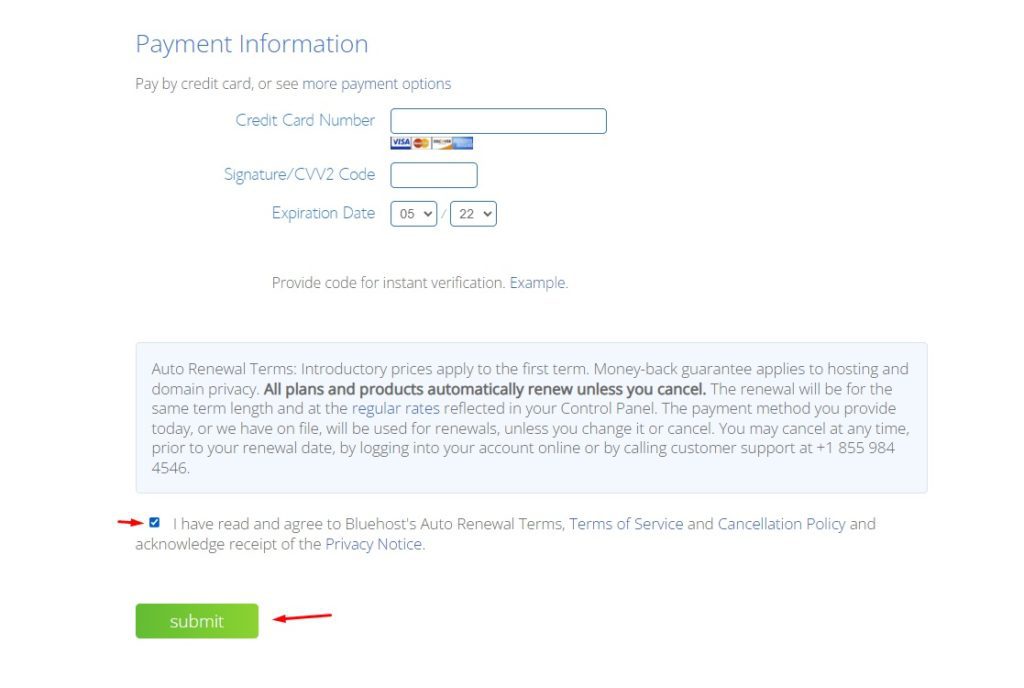
- The final section is where you will enter your payment information, enter it, and don’t forget to check the renewal terms check box.
Step Three: Installing WordPress On Bluehost
Installing WordPress on Bluehost is super easy and only takes a few clicks.
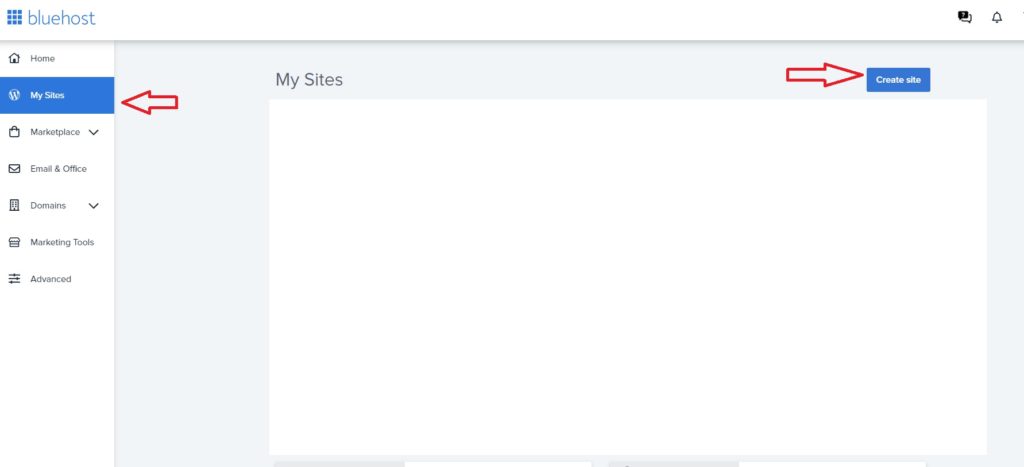
- First, you need to log in to your Bluehost account and click on the “My Sites” tab at the top.
- Then, click on the “Create Site” button.
I get a page where it asks me ” How would you like to build your WordPress site?”
Select the one on the left, WordPress, you do not really need the Bluehost website builder

- On the next page, you will be asked to enter your site name and choose a domain. If you registered your domain with Bluehost, it will already be pre-filled. If not, just enter the name of the site you did in step one. In the image below I added my domain for educational purposes only, you must add your domain name there.
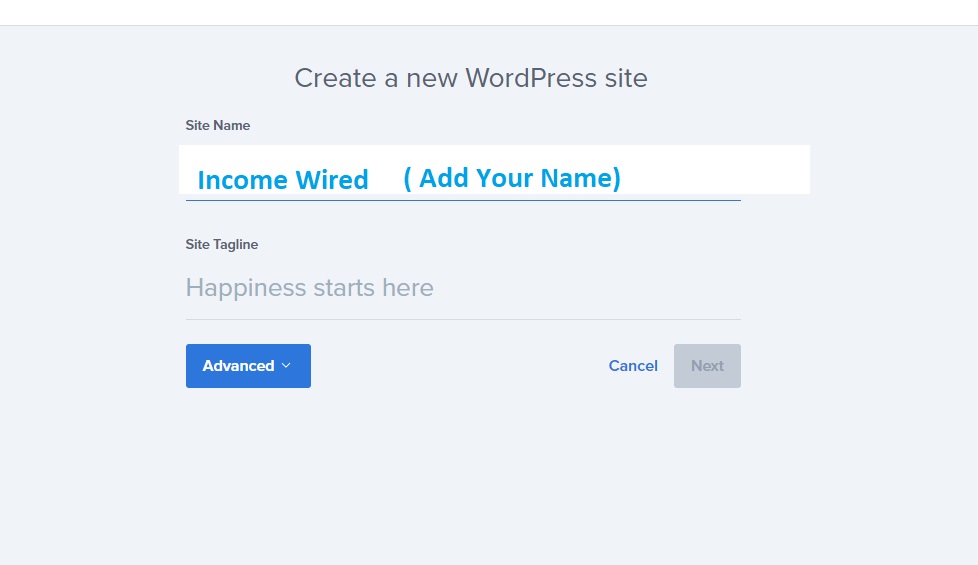
For the Site Tagline, you can enter anything you want or leave it blank…
What is a site tagline in WordPress?
A tagline is a short and catchy phrase that describes what your website or blog is about. It appears under your site title in the header of your blog.
After you’ve entered your site name and tagline, click on the “Continue” button.
On the next page, you will be asked to choose a WordPress theme.
- Click on the “Next” button when you’re done.
- Now You will get a Choose a Domain page, there you can select the domain you have registered with Bluehost
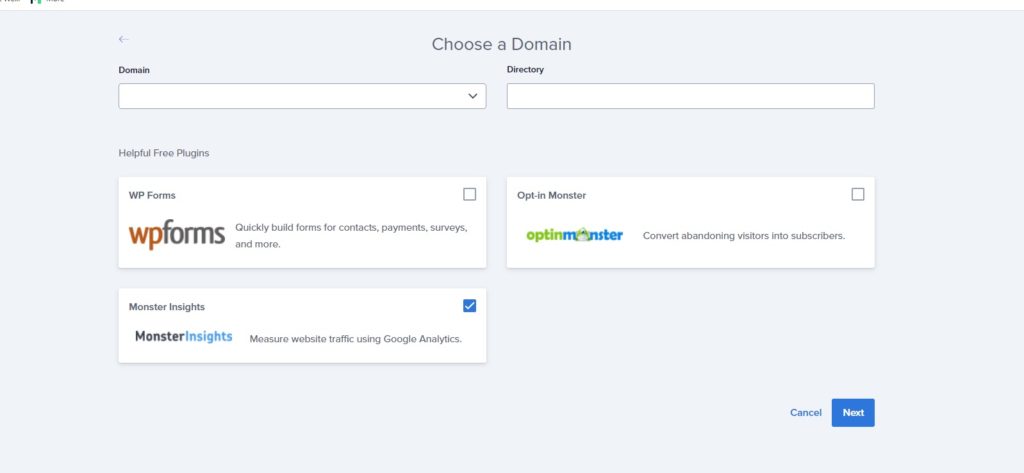
- Click on the “Next” button when you’re done. Bluehost will then provide Your username and password. Please store these somewhere safe. You can now log in to WordPress.
You have successfully installed WordPress on your domain with Bluehost
Now that you’ve installed WordPress, it’s time to start customizing your blog and adding content.
Choosing a WordPress Theme After BlueHost
After you have installed WordPress on your site, it is time to choose a theme.
A WordPress theme is basically a template that determines the design and layout of your blog.
There are thousands of free and paid themes available, so finding one that fits your needs can be a bit overwhelming.
Here are a few things to keep in mind when choosing a WordPress theme:
- Ease of use: Choose a theme that is easy to use and customize. You don’t want to spend hours trying to figure out how to change the color or font of your blog.
- Mobile friendly: Make sure the theme you choose is responsive, meaning it will adjust itself automatically for different screen sizes (desktop, tablet, and mobile).
- SEO friendly: Choose a theme that is optimized for SEO (search engine optimization) so your blog can rank higher in search results.
- Compatibility: Make sure the theme you choose is compatible with the plugins you want to use. Some themes are not compatible with certain plugins, which can cause problems down the road.
Once you’ve considered all of these factors, it’s time to start browsing through themes.
You can either browse through the thousands of free themes that are available or purchase a premium theme from a third-party site like ThemeForest.net.
For this tutorial, we’ll be using the “GeneratePress” theme since it’s a simple yet stylish theme that’s perfect for a beginner blog. This is the theme that I use for my blog.
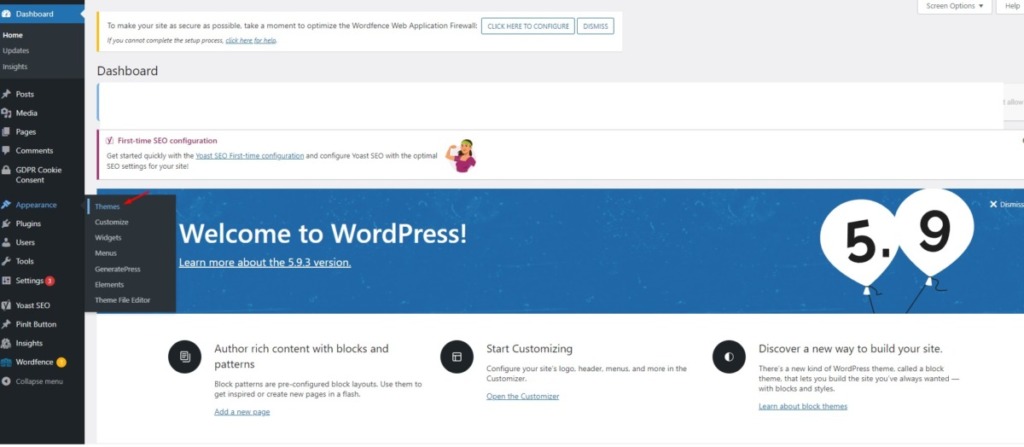
To Install Generate Press, login to WordPress with your credentials, then go to Appearance -> Themes.
Click on the “Add New” button and search for “GeneratePress.” on the box located at the top right.
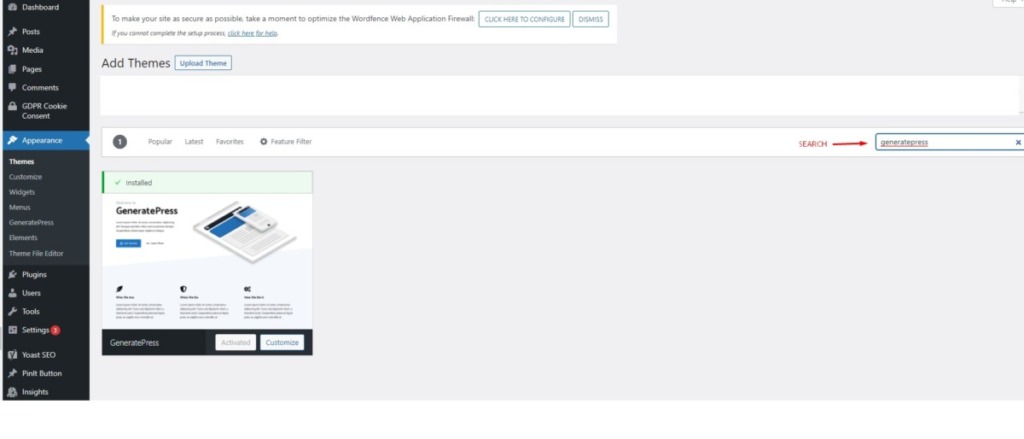
Once you’ve found the theme, hover over it and click on the “Install” button.
On the next page, just click on the “Install” button.
After the theme has been installed, click on the “Activate” button.
You have now successfully installed and activated your WordPress theme!
It’s important to note- Generate Press has a premium version that I definitely recommend.
While the free version is great, the premium version gives you access to additional features and customization options that can really take your blog to the next level.
I’ll be covering how to upgrade to the premium version in a future tutorial. For now, let’s move on to the next step.
Adding Plugins to WordPress After Installing Bluehost
Now that you’ve installed WordPress and chosen a theme, it’s time to start adding plugins.
Plugins are basically small pieces of software that add additional features and functionality to your blog.
There are thousands of plugins available, so finding ones that fit your needs can be a bit overwhelming. Here are a few things to keep in mind when choosing plugins
- Ease of use: Choose plugins that are easy to use and configure. You don’t want to spend hours trying to figure out how to set up a plugin.
- Compatibility: Make sure the plugin you choose is compatible with the theme you’re using. Some plugins are not compatible with certain themes, which can cause problems down the road.
- Functionality: Choose plugins that add features and functionality that you actually need. There’s no point in installing a bunch of plugins that you’ll never use.
For the purposes of getting your website secured, I recommend using Wordfence Security, it has a free and paid version.
I also recommend using Yoast SEO, which is a plugin that helps you optimize your website for the search engines.
Creating Your First Blog Post After Your WordPress Install
Now that you’ve installed WordPress, chosen a theme, and added some plugins, it’s time to start creating content.
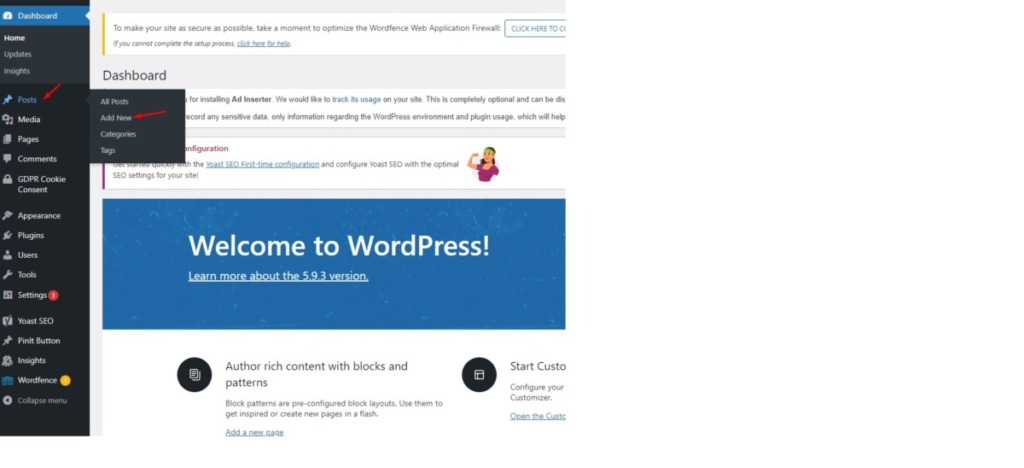
Creating your first blog post is easy. Just log in to WordPress (if you have not already) with your credentials
- go to Posts -> Add New.
On the next page, you’ll see a blank editor where you can add the title and body of your blog post.
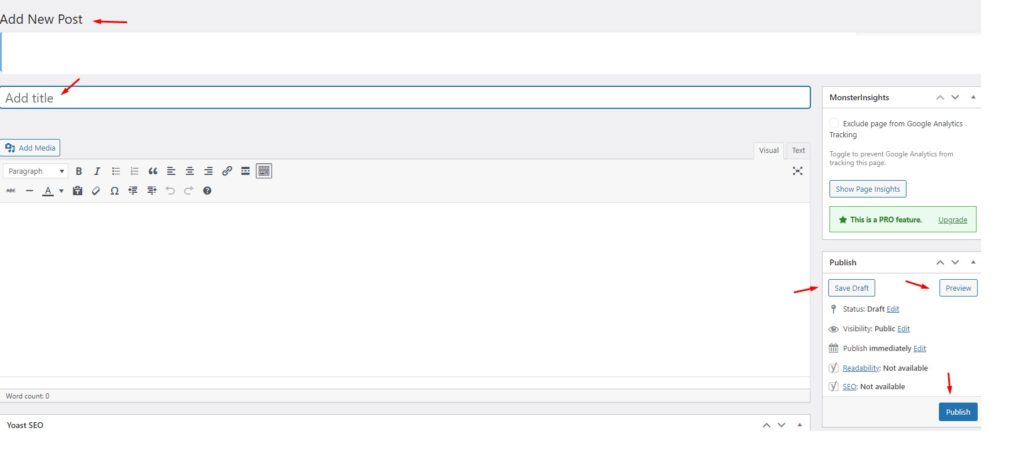
- When you’re finished writing your post, click on the “Publish” button located on the right side of the screen.
Its always recommended proofreading your blog post before you publish it, to make sure there are no typos or errors.
Now that you’ve published your first blog post, it’s time to promote it and get traffic to your website.
There are a number of ways to do this, but I’ll be covering the most effective methods in future tutorials.
For now, just focus on creating quality content and promoting your blog on social media sites like Twitter, Facebook, and Pinterest.
And that’s it! You’ve successfully created your first blog post using WordPress with Bluehost
If you follow these steps, you’ll be well on your way to building a successful blog using WordPress and Bluehost. Thanks for reading! I hope this guide was helpful. If you have any questions contact Bluehost here or if you have any comments, please feel free to leave them below!